3. Adding a Renderer
The complete code for this part of the tutorial can be found here
# file structure
- cutting_2d
    - main.py  # modified
    - env
        - core_env.py  # modified
        - inventory.py
        - maze_state.py
        - maze_action.py
        - renderer.py  # new
3.1. Renderer
To check whether our implementation of the environment works as expected and to later on observe
how trained agents behave we add a Renderer as a next step in this tutorial.
For implementing the renderer we rely on matplotlib to ensure that it is compatible with the Maze Rollout Visualization Tools.
The Cutting2DRenderer will show the selected piece (the MazeAction) on the left,
along with the current MazeState of the inventory on the right as shown here.
from typing import Tuple, Optional, Union

import numpy as np
import matplotlib.patches as patches
import matplotlib.pyplot as plt

from maze.core.annotations import override
from maze.core.log_events.step_event_log import StepEventLog
from maze.core.rendering.renderer import Renderer
from .maze_action import Cutting2DMazeAction
from .maze_state import Cutting2DMazeState


class Cutting2DRenderer(Renderer):
    """Rendering class for the 2D cutting env.

    The ``Cutting2DRenderer`` will show the selected piece (the maze_action) on the left,
    plus the current state of the inventory on the right
    """

    @override(Renderer)
    def render(self, maze_state: Cutting2DMazeState, maze_action: Optional[Cutting2DMazeAction], events: StepEventLog) -> Union[None, np.ndarray]:
        """
        Render maze_state and maze_action of the cutting 2D env.

        :param maze_state: MazeState to render
        :param maze_action: MazeAction to render
        :param events: Events logged during the step (not used)
        :return: None as the state is rendered.
        """

        plt.figure("Cutting 2D", figsize=(8, 4))
        plt.clf()

        # The maze_action taken

        plt.subplot(121, aspect='equal')
        if maze_action is not None:
            self._plot_maze_action(maze_action, "MazeAction", maze_state)
        else:
            self._add_title("MazeAction (none)")

        # The inventory state
        plt.subplot(122, aspect='equal')
        self._plot_inventory(maze_state, maze_action)

        plt.tight_layout()
        plt.draw()
        plt.pause(0.1)

    def _plot_maze_action(self, maze_action: Cutting2DMazeAction, title: str, maze_state: Cutting2DMazeState):
        piece_to_cut = maze_state.inventory[maze_action.piece_id]
        if maze_action.rotate:
            piece_to_cut = piece_to_cut[::-1]

        plt.xlim([0, maze_state.raw_piece_size[0]])
        plt.ylim([0, maze_state.raw_piece_size[1]])

        self._draw_piece(piece_to_cut)
        self._draw_piece(maze_state.current_demand, highlight=True)
        self._draw_cutting_lines(maze_state.current_demand, piece_to_cut, maze_action.reverse_cutting_order)
        self._add_title(title)

    def _plot_inventory(self, maze_state: Cutting2DMazeState, maze_action: Cutting2DMazeAction):

        # plot inventory pieces
        inventory_piece_dims = np.vstack(maze_state.inventory)
        inventory_piece_dims = np.sort(inventory_piece_dims, axis=1)
        plt.plot(inventory_piece_dims[:, 0], inventory_piece_dims[:, 1], "ko",
                 alpha=0.5, label="inventory pieces")
        # plot current demand
        current_demand = sorted(maze_state.current_demand)
        plt.plot(current_demand[0], current_demand[1], "o",
                 color=(0.7, 0.2, 0.2), alpha=0.75, label="current demand")
        # plot maze_action
        piece_to_cut = inventory_piece_dims[maze_action.piece_id]
        plt.plot(piece_to_cut[0], piece_to_cut[1], "bo",
                 alpha=0.75, label="cutting inventory piece")
        plt.grid()
        plt.legend()
        plt.axis("equal")
        self._add_title("Inventory Pieces")

    @staticmethod
    def _draw_piece(piece: Tuple[int, int], highlight: bool = False):
        plt.gca().add_patch(patches.Rectangle((0, 0), piece[0], piece[1],
                                              facecolor=(0.7, 0.2, 0.2) if highlight else (0.8, 0.8, 0.8)))

    @staticmethod
    def _add_title(title: str):
        plt.title(title, fontdict=dict(fontsize=16, fontweight='bold', horizontalalignment='left'), loc='left')

    @staticmethod
    def _draw_cutting_lines(ordered_piece: Tuple[int, int], piece_to_cut: Tuple[int, int], reverse_cutting_order: bool):
        """Draw the cutting lines.

        :param ordered_piece: Size of the ordered piece
        :param piece_to_cut: Piece which we are cutting
        :param reverse_cutting_order: If we should cut along Y axis first (instead of X first)
        """

        if reverse_cutting_order:
            h_x = (0, piece_to_cut[0])
            h_y = (ordered_piece[1], ordered_piece[1])
            v_x = (ordered_piece[0], ordered_piece[0])
            v_y = (0, ordered_piece[1])
        else:
            h_x = (0, ordered_piece[0])
            h_y = (ordered_piece[1], ordered_piece[1])
            v_x = (ordered_piece[0], ordered_piece[0])
            v_y = (0, piece_to_cut[1])

        plt.plot(h_x, h_y, color='black', linestyle="--")
        plt.plot(v_x, v_y, color='black', linestyle="--")
3.2. Updating the CoreEnv
To make use of the renderer we simple have to instantiate it in the constructor of the CoreEnv and
make it accessible via the get_renderer() method.
from .renderer import Cutting2DRenderer
...


class Cutting2DCoreEnvironment(CoreEnv):

    def __init__(self, max_pieces_in_inventory: int, raw_piece_size: (int, int), static_demand: (int, int)):
        super().__init__()

        # initialize rendering
        self.renderer = Cutting2DRenderer()
        ...

    def get_renderer(self) -> Cutting2DRenderer:
        """Cutting 2D renderer module."""
        return self.renderer
3.3. Test Script
The following snippet will instantiate the environment and run it for 15 steps.
""" Test script CoreEnv """
from tutorial_maze_env.part02_renderer.env.core_env import Cutting2DCoreEnvironment
from tutorial_maze_env.part02_renderer.env.maze_action import Cutting2DMazeAction


def main():
    # init and reset core environment
    core_env = Cutting2DCoreEnvironment(max_pieces_in_inventory=200, raw_piece_size=[100, 100],
                                        static_demand=(30, 15))
    maze_state = core_env.reset()
    # run interaction loop
    for i in range(15):
        # create cutting maze_action
        maze_action = Cutting2DMazeAction(piece_id=0, rotate=False, reverse_cutting_order=False)

        # render current state along with next maze_action
        core_env.renderer.render(maze_state, maze_action, None)

        # take actual environment step
        maze_state, reward, done, info = core_env.step(maze_action)
        print(f"reward {reward} | done {done} | info {info}")


if __name__ == "__main__":
    """ main """
    main()
When running the script you should get the following command line output:
reward -1 | done False | info {'msg': 'valid_cut'}
reward 0 | done False | info {'msg': 'valid_cut'}
reward 0 | done False | info {'msg': 'valid_cut'}
...
and a rendering of the current MazeState and MazeAction in each time step similar to the image shown below:
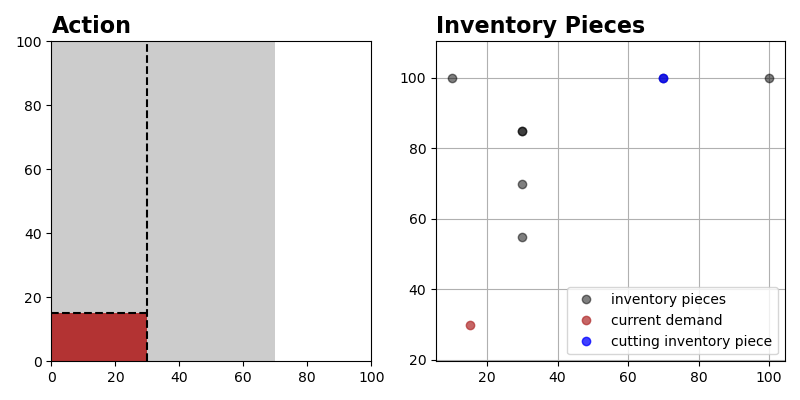
The dashed line represents the cutting configuration specified with the MazeAction.