Observation Pre-Processing
Sometimes it is required to pre-process or modify observations before passing them through our policy or value networks. This might be for example the conversion of an three channel RGB image to a single channel grayscale image or the one-hot encoding of a categorical observation such as the current month into a feature vector of length 12. Maze supports observation pre-processing via the PreProcessingWrapper.
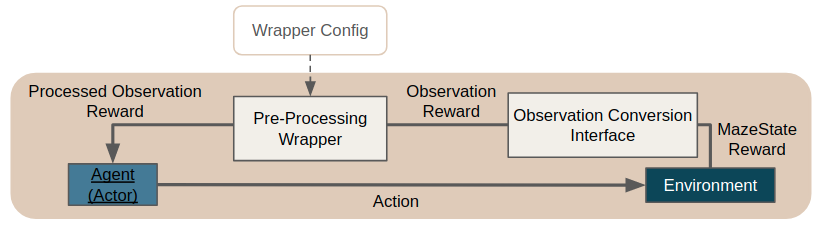
This means to gain access to observation pre-processing and to the features listed below you simply have to add the PreProcessingWrapper to your wrapper stack in your Hydra configuration.
To get started you can also just copy one of our Hydra config snippets or use it directly from Python.
List of Features
Maze observation pre-processing supports:
Gym dictionary observation spaces
Individual pre-processors for all sub-observations of these dictionary spaces
Cascaded pre-processing pipelines for a single observation (e.g. first convert an image to grayscale before inserting an additional dimension from the left for CNN processing)
The option to keep both, the original as well as the pre-processed observation
Implicit update of affected observation spaces according to the pre-processor functionality
Example 1: Observation Specific Pre-Processors
This example adds pre-processing to two observations (rgb_image and categorical_feature) contained in a dictionary observation space.
# @package wrappers
maze.core.wrappers.observation_preprocessing.preprocessing_wrapper.PreProcessingWrapper:
    pre_processor_mapping:
        - observation: rgb_image
          _target_: maze.preprocessors.Rgb2GrayPreProcessor
          keep_original: true
          config:
            num_flatten_dims: 2
        - observation: categorical_feature
          _target_: maze.preprocessors.OneHotPreProcessor
          keep_original: false
          config: {}
Details:
Adds a gray scale converted version of observation rgb_image to the observation space but also keeps the original observation.
Replaces the observation categorical_feature with an one-hot encoded version and drops the original observation.
Observations space after pre-processing: {rgb_image, rgb_image-rgb2gray, categorical_feature-one_hot})
Example 2: Cascaded Pre-Processing
This example shows how to apply multiple pre-processor in sequence to a single observation.
# @package wrappers
maze.core.wrappers.observation_preprocessing.preprocessing_wrapper.PreProcessingWrapper:
  pre_processor_mapping:
    - observation: rgb_image
      _target_: maze.preprocessors.Rgb2GrayPreProcessor
      keep_original: false
      config:
        rgb_dim: -1
    - observation: rgb_image-rgb2gray
      _target_: maze.preprocessors.ResizeImgPreProcessor
      keep_original: false
      config:
        target_size: [96, 96]
        transpose: false
    - observation: rgb_image-rgb2gray-resize_img
      _target_: maze.preprocessors.UnSqueezePreProcessor
      keep_original: false
      config:
        dim: -3
Details:
Converts observation rgb_image into a gray scale image, then scales this gray scale image to size 96 x 96 pixel and finally inserts an additional dimension at index -3 to prepare the observation for CNN processing.
None of the intermediate observations is kept as we are only interested in the final result here.
Observations space after pre-processing: {rgb_image-rgb2gray-resize_img}).
Example 3: Using Custom Pre-Processors
In case the built-in pre-processors provided with Maze are not sufficient for your use case you can of course implement and add additional custom processors.
# @package wrappers
maze.core.wrappers.observation_preprocessing.preprocessing_wrapper.PreProcessingWrapper:
    pre_processor_mapping:
        - observation: rgb_image
          _target_: my_project.preprocessors.custom.CustomPreProcessor
          keep_original: true
          config:
            num_flatten_dims: 2
When adding a new pre-processor you (1) have to implement the PreProcessor interface and (2) make sure that it is accessible within your Python path. Besides that you only have to provide the reference path of the pre-processor to use.
Observations will be tagged with the filename of your custom preprocessor (e.g. rgb_image -> rgb_image-custom).
Example 4: Plain Python Configuration
If you are not working with the Maze command line interface but still want to reuse observation pre-processing directly within Python you can start with the code snippet below.
"""Contains an example showing how to use observation pre-processing directly from python."""
from maze.core.wrappers.maze_gym_env_wrapper import GymMazeEnv
from maze.core.wrappers.observation_preprocessing.preprocessing_wrapper import PreProcessingWrapper

# this is the pre-processor config as a python dict
config = {
    "pre_processor_mapping": [
        {"observation": "observation",
         "_target_": "maze.preprocessors.Rgb2GrayPreProcessor",
         "keep_original": False,
         "config": {"rgb_dim": -1}},
    ]
}

# instantiate a maze environment
env = GymMazeEnv("CarRacing-v0")

# wrap the environment for observation pre-processing
env = PreProcessingWrapper.wrap(env, pre_processor_mapping=config["pre_processor_mapping"])

# after this step the training env yields pre-processed observations
pre_processed_obs = env.reset()
Built-in Pre-Processors
Maze already provides built-in pre-processors. You can find a list and further details on the functionality of the respective processors in the reference documentation.
Where to Go Next
After pre-processing your observations you might also want to normalize them for efficient neural network processing using the ObservationNormalizationWrapper.
Learn about more general environment wrappers.